This tutorial builds a complete, production-ready AI email automation pipeline using n8n — fully self-hosted, zero monthly fees, and 100% under your control. By the end, you will have a live workflow that monitors your inbox via IMAP, classifies every email with AI, auto-drafts context-aware replies, and either sends them automatically or saves them as drafts for review.
No black-box tools. No per-execution billing. Every node is visible, editable, and explainable.
What You Will Build — Full Pipeline Overview
Here is the complete workflow you will have running by the end of this tutorial. Every box is an n8n node. Data flows left to right.
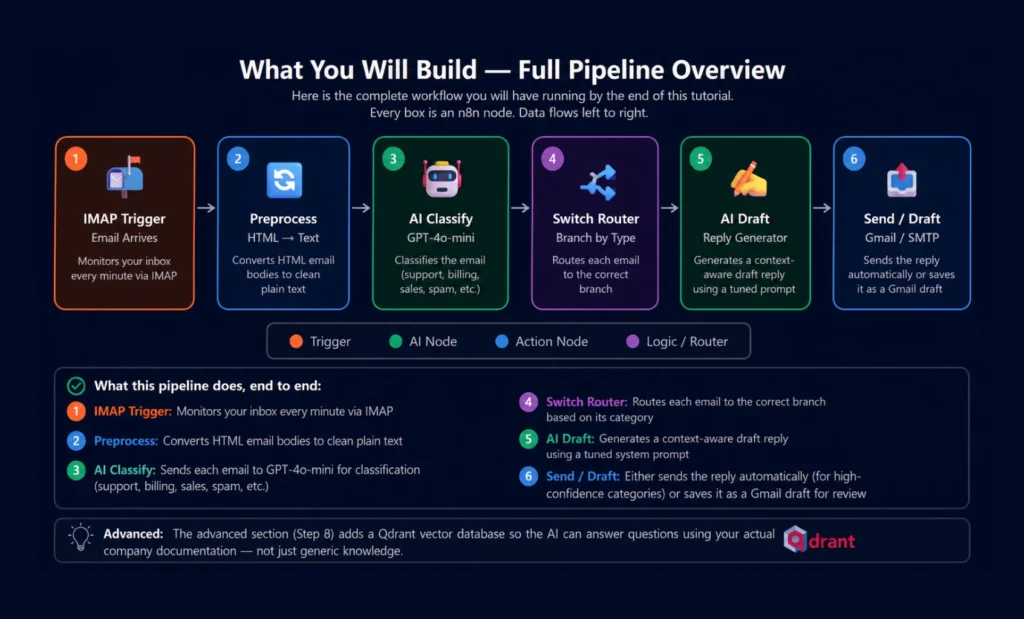
What this pipeline does, end to end:
- Monitors your inbox every minute via IMAP
- Converts HTML email bodies to clean plain text
- Sends each email to GPT-4o-mini for classification (support, billing, sales, spam, etc.)
- Routes each email to the correct branch based on its category
- Generates a context-aware draft reply using a tuned system prompt
- Either sends the reply automatically (for high-confidence categories) or saves it as a Gmail draft for review
The advanced section (Step 8) adds a Qdrant vector database so the AI can answer questions using your actual company documentation — not just generic knowledge.
Prerequisites & Stack Overview
Docker + Docker Compose
Any OS. v20.10+ recommended.
OpenAI API Key
Free tier works for testing. GPT-4o-mini is cheapest.
IMAP Email Account
Gmail, Outlook, or any IMAP-enabled inbox.
Server or Local Machine
Min 2GB RAM. VPS costs ~$5–12/month.
Qdrant (Vector DB)
Only needed for Step 8 RAG pipeline.
PostgreSQL
Recommended for production. SQLite works for dev.
| Stack Component | Role | Cost | Alternative |
|---|---|---|---|
| n8n (self-hosted) | Workflow orchestration engine | Free | n8n Cloud ($20+/mo) |
| OpenAI GPT-4o-mini | Email classification + draft generation | ~$0.002/email | Ollama (local, free) |
| IMAP node | Inbox monitoring trigger | Free (built-in) | Gmail Trigger node |
| Gmail / SMTP node | Send replies or save drafts | Free | Any SMTP provider |
| Qdrant | Vector DB for RAG (Step 8) | Free (self-hosted) | Pinecone, Weaviate |
Cost Reality Check: Running 500 emails/day through GPT-4o-mini for classification + drafting costs approximately $1–3/day in API fees. Self-hosting n8n on a $6/month Hetzner VPS means your total cost is under $100/month for a full AI email automation system — versus $500+/month for SaaS alternatives.
Step 1 — Install n8n Self-Hosted (Docker)
The fastest production-ready setup uses Docker Compose with PostgreSQL for persistent storage. Run these commands on your server or local machine.
1a. Create the project directory
# Create directory and navigate into it
mkdir n8n-email-automation && cd n8n-email-automation
mkdir n8n_data
1b. Create the Docker Compose file
version: "3.8"
services:
# PostgreSQL — persistent workflow & credential storage
postgres:
image: postgres:15-alpine
container_name: n8n-db
restart: always
environment:
POSTGRES_DB: n8n
POSTGRES_USER: n8n
POSTGRES_PASSWORD: your-secure-password
volumes:
– postgres_data:/var/lib/postgresql/data
networks:
– n8n-net
# n8n — the workflow engine
n8n:
image: n8nio/n8n:latest
container_name: n8n
restart: always
ports:
– "5678:5678"
environment:
# Database
– DB_TYPE=postgresdb
– DB_POSTGRESDB_HOST=postgres
– DB_POSTGRESDB_PORT=5432
– DB_POSTGRESDB_DATABASE=n8n
– DB_POSTGRESDB_USER=n8n
– DB_POSTGRESDB_PASSWORD=your-secure-password
# Timezone
– GENERIC_TIMEZONE=UTC
– TZ=UTC
# Executions
– EXECUTIONS_PROCESS=main
– N8N_RUNNERS_ENABLED=true
volumes:
– ./n8n_data:/home/node/.n8n
depends_on:
– postgres
networks:
– n8n-net
volumes:
postgres_data:
n8n_data:
networks:
n8n-net:
driver: bridge
1c. Start n8n
# Start all containers in background
docker compose up -d
# Watch startup logs
docker compose logs -f n8n
# n8n is ready when you see:
# "Editor is now accessible via: http://localhost:5678"
Open http://localhost:5678 in your browser. Create your admin account. You are now inside the n8n canvas.
Quick Cloud Alternative: Not ready to self-host? n8n Cloud offers a free trial at n8n.io — skip straight to Step 2. You can always migrate your workflow JSON to self-hosted later.
Step 2 — IMAP Email Trigger Node Setup
This node monitors your inbox and fires the workflow every time a new email arrives. In n8n, click + Add Node → search “Email Trigger (IMAP)”.
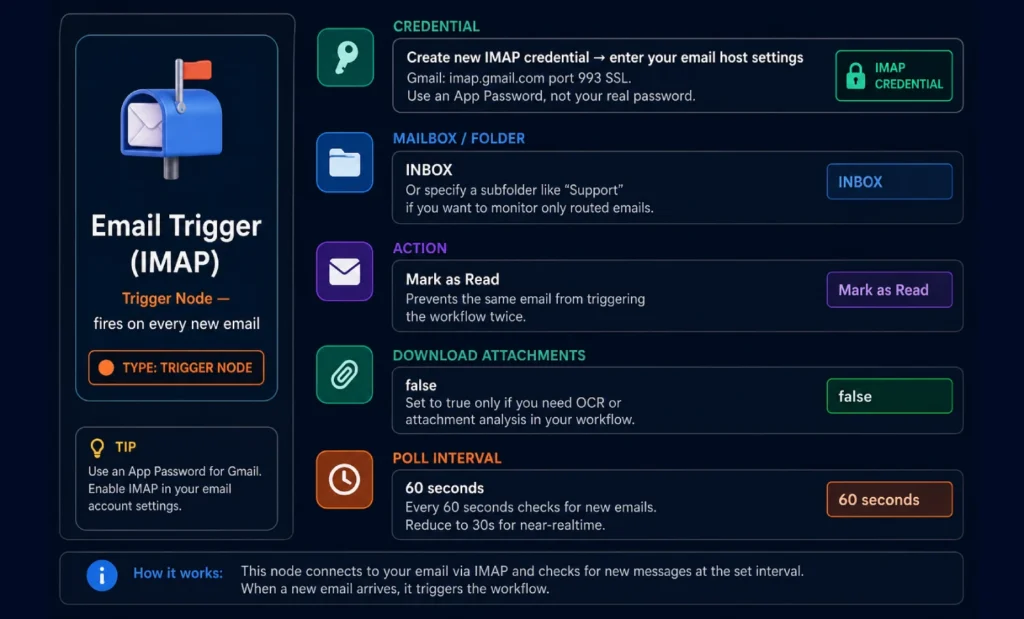
Gmail App Password Setup (Important)
Gmail blocks basic IMAP authentication by default. You need an App Password:
- Enable 2-Factor Authentication on your Google account: Go to myaccount.google.com → Security → 2-Step Verification
- Generate an App Password: myaccount.google.com → Security → App Passwords → Select “Mail” → Generate. Copy the 16-character password.
- Use App Password in n8n IMAP credential: Host: imap.gmail.com | Port: 993 | SSL: ON | Password: the 16-character App Password
Step 3 — Email Preprocessing Node
Emails arrive as raw HTML. Sending HTML directly to the AI wastes tokens and confuses the model with tags. This node converts it to clean plain text first.
Add a Code Node (search “Code”) after the IMAP trigger. Set language to JavaScript and paste:
// Clean HTML email body to plain text
// Runs for each email item the IMAP trigger produces
const items = $input.all();
return items.map(item => {
const html = item.json.text?.html || item.json.text?.plain || "";
// Strip HTML tags
let plain = html
.replace(/<style[^>]*>[\s\S]*?<\/style>/gi, "")
.replace(/<script[^>]*>[\s\S]*?<\/script>/gi, "")
.replace(/<[^>]+>/g, " ")
.replace(/ /g, " ")
.replace(/&/g, "&")
.replace(/</g, "<")
.replace(/>/g, ">")
.replace(/\s+/g, " ")
.trim();
// Truncate to 3000 chars to save tokens
if (plain.length > 3000) {
plain = plain.substring(0, 3000) + "... [truncated]";
}
return {
json: {
...item.json,
cleanBody: plain,
subject: item.json.subject || "(no subject)",
from: item.json.from?.value?.[0]?.address || "unknown",
fromName: item.json.from?.value?.[0]?.name || "",
}
};
});Step 4 — AI Email Classifier Node
Add an OpenAI node after the Code node. This node sends each email to GPT-4o-mini and gets back a single category label.

Using Ollama Instead of OpenAI (Free & Private): If you want fully local classification with no API costs, replace the OpenAI node with an Ollama node using llama3.1 or mistral. Accuracy is slightly lower but privacy is complete — nothing leaves your server. Add
ollamaas a service in your docker-compose.yml.
Step 5 — Switch Router (Branch by Category)
Add a Switch node after the classifier. This routes each email to a different branch based on what the AI returned.

Each output of the Switch node connects to a different branch. The SPAM branch goes directly to an archive action. Other branches go to the AI Draft node with different system prompts.
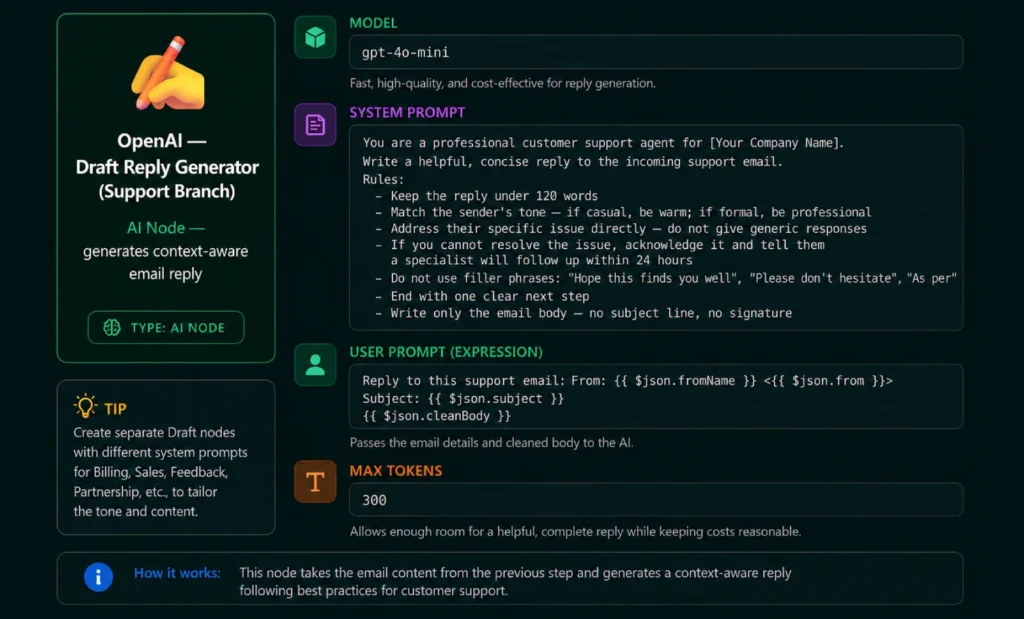
Step 6 — AI Draft Generator Node
Each non-spam branch gets its own OpenAI node with a system prompt tuned for that category. Here is the configuration for the Support branch — replicate it for other categories, adjusting the system prompt.
System Prompts for Other Branches
Paste these into the matching branch’s OpenAI draft node:
System Prompt — BILLING_QUERY Branch
You are a billing specialist for [Your Company]. Reply to this billing question professionally and accurately.
Rules:
– Be specific about payment terms, refund policies, or pricing where relevant
– If the question requires account lookup, say: "I am checking your account details and will reply within 2 hours"
– Never make up specific prices or policy details you are not sure about
– Keep reply under 100 words
– No filler phrases, no exclamation marks
– Write only the email body
System Prompt — SALES_INQUIRY Branch
You are a sales development representative for [Your Company]. Reply to this sales inquiry warmly and professionally.
Rules:
– Acknowledge their specific interest or question
– Briefly highlight one relevant value proposition that matches their question
– End with an invitation to book a 15-minute call: include a Calendly link placeholder [CALENDLY_LINK]
– Keep the reply under 120 words — do not over-pitch
– Sound like a helpful human, not a sales robot
– Write only the email body
Step 7 — Send Reply or Save as Gmail Draft
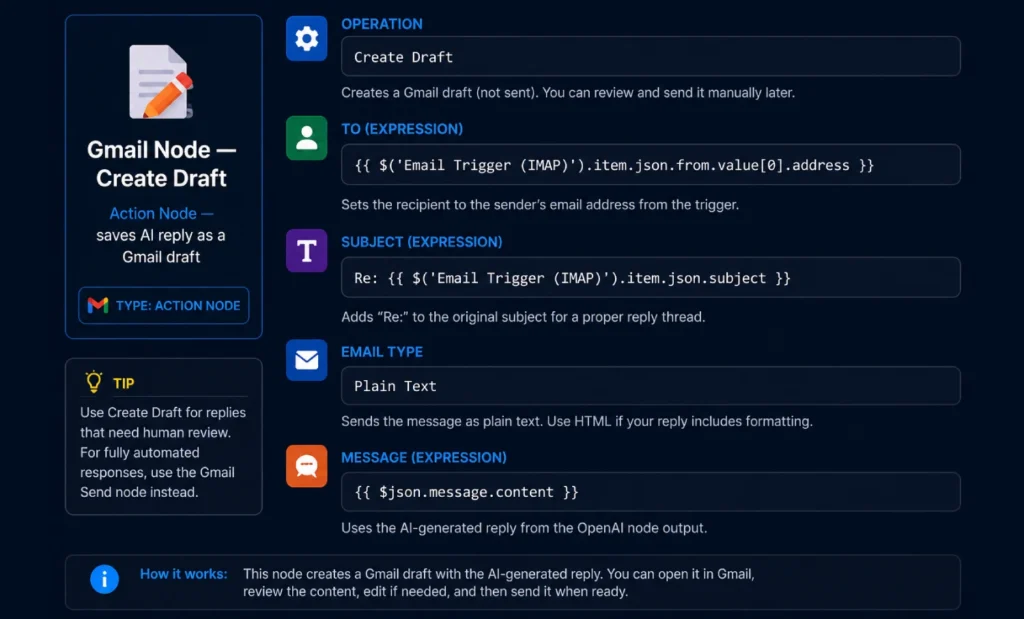
After the AI generates the draft, you have two options. Option A saves it as a Gmail draft for human review (recommended to start). Option B sends automatically (use only after testing thoroughly).
Option A — Save as Gmail Draft (Recommended First)
Option B — Send Automatically via SMTP
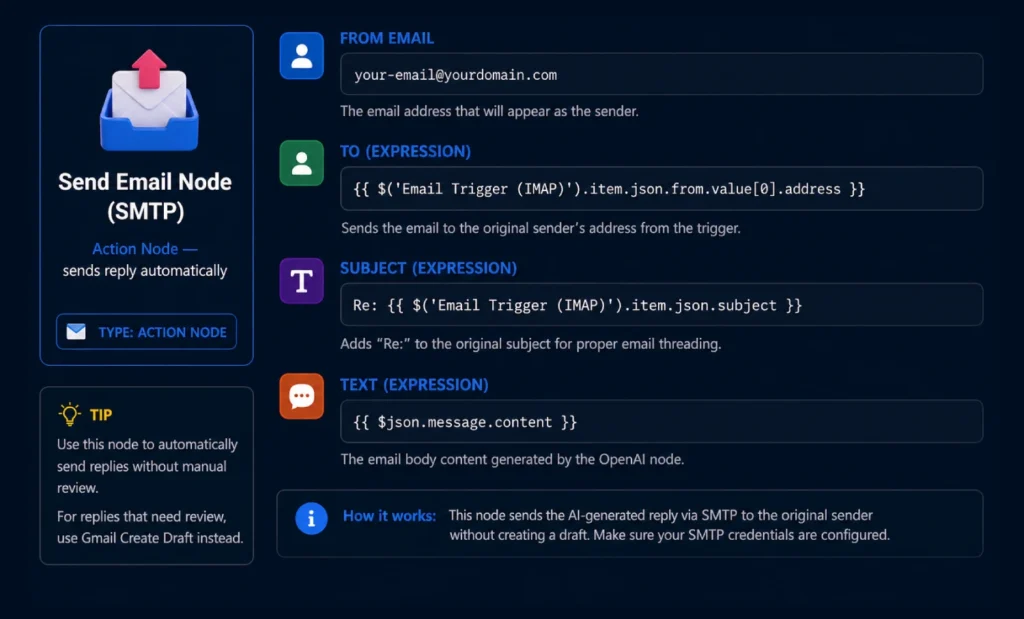
Do Not Auto-Send Until You Have Tested 50+ Emails: Run the workflow in “Save as Draft” mode for at least one week before enabling auto-send. Read every draft, correct the prompts, and only switch to automatic sending once you are confident the AI handles edge cases correctly.
Step 8 — (Advanced) Add RAG with Qdrant Vector Database
By default, the AI drafts replies using only its training knowledge. With RAG (Retrieval-Augmented Generation), it can also search your company’s actual documentation — FAQs, product specs, pricing tables — before drafting a reply.
What RAG Changes
Without RAG: AI answers from general knowledge → may get product details wrong.
With RAG: AI searches your docs first → answers are specific, accurate, and grounded in your actual information.
8a. Add Qdrant to Docker Compose
qdrant:
image: qdrant/qdrant:latest
container_name: qdrant
restart: always
ports:
– "6333:6333"
volumes:
– qdrant_data:/qdrant/storage
networks:
– n8n-net
# Also add to volumes section:
qdrant_data:
8b. The RAG Pipeline in n8n
Between the Switch Router and the Draft Generator, add these three nodes for each branch that needs knowledge-based replies:
- Embeddings OpenAI Node: Takes the cleaned email body and generates a vector embedding using text-embedding-3-small model. This converts the email’s meaning into numbers Qdrant can search.
- Qdrant Vector Store Node — Search: Uses the embedding to search your Qdrant collection for the most relevant documentation chunks. Set Top K to 3 (returns 3 most relevant passages).
- Code Node — Build RAG Context: Combines the retrieved document chunks into a context string that gets prepended to the AI draft prompt — “Based on the following documentation: [chunks] — reply to this email: [email]”
8c. Load Your Documents into Qdrant
Create a separate n8n workflow that runs once (or weekly) to vectorize your documentation:
Manual Trigger
→ Google Drive node: Download all files from "Knowledge Base" folder
→ Code node: Split documents into 500-token chunks with overlap
→ Embeddings OpenAI: Generate vector for each chunk
→ Qdrant Vector Store: Upsert all chunks into "email-knowledge" collection
# Supported document types: PDF, .txt, .md, .docx
# Run this workflow whenever you update your FAQ or product docs
# The email workflow will automatically use the latest knowledge
Step 9 — Error Handling & Slack Alerts
Production workflows need error handling. Without it, a failed OpenAI call silently drops an email and you never know.
9a. Add Error Workflow
In n8n Settings → go to each workflow → set Error Workflow. Create a separate workflow called “Email Automation Error Handler” with:
- Error Trigger Node: This fires whenever any node in your main workflow throws an error.
- Slack / Email Notification Node: Send yourself an alert with the error message, the email subject that failed, and the node name. This gives you visibility without monitoring constantly.
- Fallback: Save Failed Email to Google Sheets: Log the original email to a spreadsheet so you can manually reply to anything the automation could not handle.
9b. Add Retry Logic for OpenAI Calls
OpenAI APIs occasionally time out. In each OpenAI node settings, enable “On Error: Retry” with 2 retries and a 5-second wait.
# In each OpenAI node → Settings tab:
On Error: Retry
Retry On Fail: true
Max Tries: 2
Wait Between Tries: 5000 (5 seconds in ms)
# If all retries fail, the Error Workflow fires
# and you get a Slack notification with the failed email details
Step 10 — Production Checklist
Before activating the workflow for real email, go through this checklist:
| Check | What to Verify | Status |
|---|---|---|
| ✅ IMAP credential | Test the trigger manually — confirm email data arrives correctly | Required |
| ✅ Classification accuracy | Run 20 test emails — verify categories are correct 90%+ of the time | Required |
| ✅ Draft quality | Review 30+ AI drafts before enabling auto-send | Required |
| ✅ Spam branch | Confirm spam emails archive correctly and do not get replied to | Required |
| ✅ Error workflow | Trigger a fake error — confirm you receive a Slack/email alert | Required |
| ✅ Docker volume backup | Set up daily backup of n8n_data and postgres_data volumes | Recommended |
| ✅ n8n version pinned | Change n8nio/n8n:latest to a specific version tag in production | Recommended |
| ✅ OpenAI API spend limit | Set a monthly spend limit in your OpenAI dashboard to prevent runaway costs | Required |
| ✅ Rate limiting | Add a Wait node (1-2 seconds) if processing bulk emails to avoid API rate limits | If needed |
| ✅ Privacy review | Confirm your email contents are acceptable to send to OpenAI per your data agreements | Required |
You Are Live: Once the checklist passes, activate your workflow in n8n (toggle at top right of the canvas). The IMAP trigger will begin polling and your AI email pipeline is running. Monitor the Executions tab for the first 48 hours to catch any edge cases.
Frequently Asked Questions
Yes. n8n is open-source (fair-code license) and free to self-host with no execution limits. You pay only for your server (typically $5–12/month on Hetzner, DigitalOcean, or similar) and your OpenAI API usage. The n8n Cloud hosted version starts at $20/month and has execution limits — self-hosting avoids both costs.
Using GPT-4o-mini: classification costs roughly $0.0002 per email, drafting costs roughly $0.001–0.002 per email. At 100 emails/day, total API cost is approximately $0.20–0.40/day — about $6–12/month. At 500 emails/day, expect $30–60/month in API costs. Set a monthly spend limit in your OpenAI dashboard to prevent unexpected charges.
Yes, with additional nodes. Enable “Download Attachments” in the IMAP trigger. Add a PDF Extract node (using pdf-parse) or a Code node to read text from the attachment. Pass the extracted text along with the email body to the AI nodes. For image attachments, you can use GPT-4o (vision-capable) instead of GPT-4o-mini to analyze images directly. This adds complexity but opens up powerful document-processing workflows.
You Now Have a Production-Grade AI Email Pipeline
What you built in this tutorial would cost $500+/month on SaaS platforms. Running it yourself costs under $20/month — and you own every part of it. No vendor lock-in, no per-execution billing, no black-box logic you cannot inspect or change.
Start with the “Save as Draft” mode for two weeks, tune your system prompts based on what the AI gets wrong, then gradually move high-confidence categories to auto-send.
What are you automating first? Drop your use case in the comments.
- ChatGPT Prompts for Email Automation — Use These Prompts in Your n8n Workflow
- AI Email Automation: The Complete Pillar Guide