
WordPress is a popular platform that provides a plethora of features and options to website owners. One of the most significant features is the ability to create custom post types. Custom post types allow website owners to organize their content in a way that makes sense for their specific website.
In this guide, we will walk you through the steps to create custom post types in WordPress. Whether you want to create a custom post type for your blog, portfolio, or products, this guide has got you covered.
Enhance Your WordPress Website’s Functionality with Custom Post Types
Step 1: Install and activate the Custom Post Type UI plugin
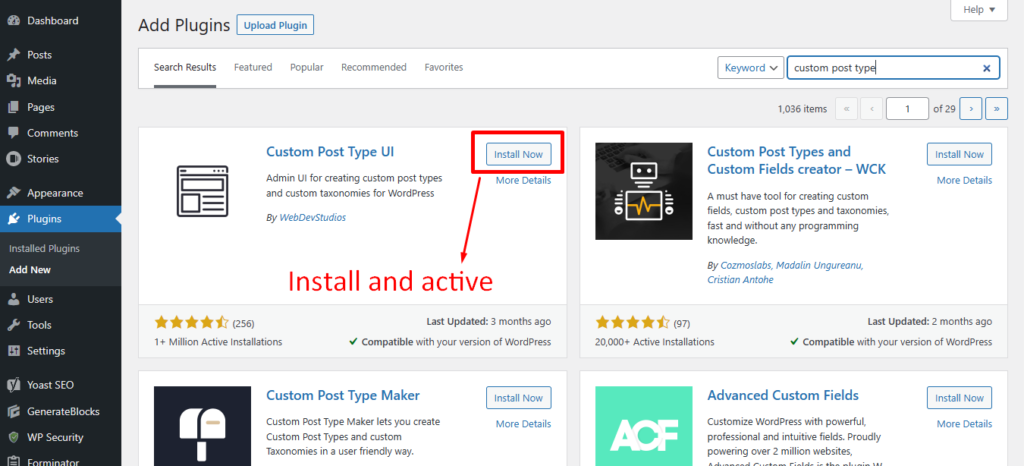
To create custom post types in WordPress, you will need to install and activate the Custom Post Type UI plugin. This plugin allows you to create and manage custom post types and taxonomies easily.
Step 2: Create a new custom post type
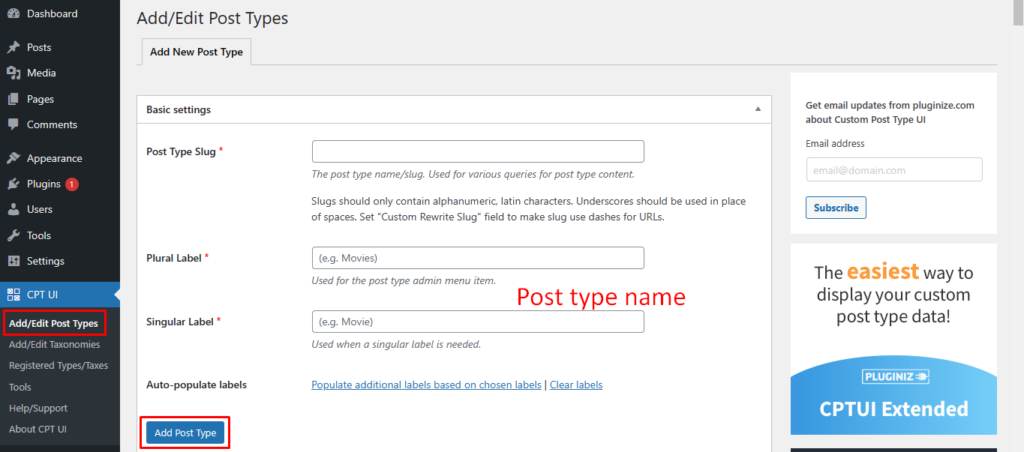
After activating the Custom Post Type UI plugin, navigate to the “CPT UI” option in the WordPress dashboard. From here, you can create a new custom post type by clicking on the “Add/Edit Post Types” button.
Step 3: Configure your custom post type settings
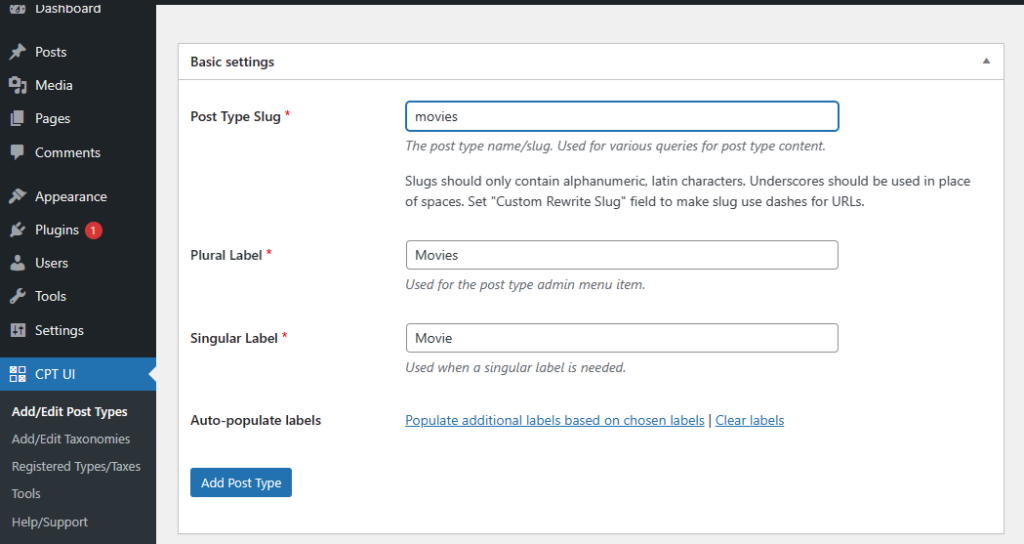
In the “Add New Post Type” section, you can configure your custom post type settings. This includes setting the name, label, slug, and other options for your custom post type.
Step 4: Add custom taxonomies to your post type
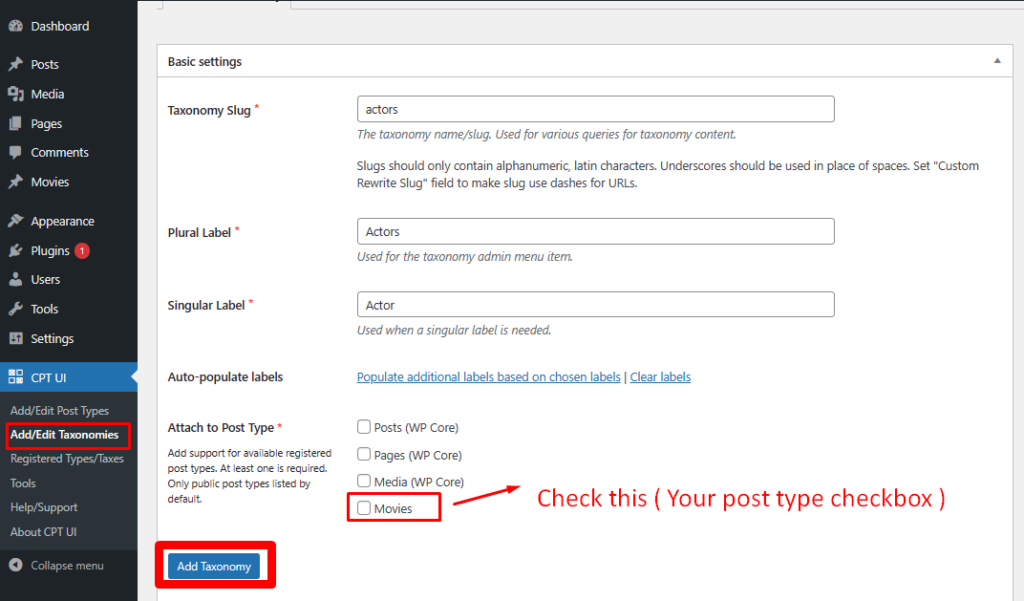
If you want to further organize your custom post type, you can add custom taxonomies. Taxonomies are used to group and categorize content. To add custom taxonomies, navigate to the “Add/Edit Taxonomies” section in the Custom Post Type UI plugin.
Step 5: Publish your custom post type
Once you have configured your custom post type settings and taxonomies, click the “Publish” button to make your custom post type live on your website.
Custom post types can help improve the user experience of your website by organizing your content in a way that makes sense for your specific website. By following the steps outlined in this guide, you can create custom post types in WordPress and take your website’s functionality to the next level.
Learn How to Create Custom Post Types in WordPress with Custom Code?
Now we are going to create custom post types in WordPress using custom code. This will give you more control over your website’s functionality and customization.
Step 1: Access Your WordPress Functions File
To create custom post types using custom code, you will need to access your WordPress functions file. This file is located in your WordPress theme’s folder and is named “functions.php.”
Step 2: Add Custom Code to Your Functions File
Once you have accessed your functions file, you can begin adding custom code to create your custom post types. The code to create a custom post type typically includes the post type’s name, label, description, and other parameters.
Here’s an example code to create a custom post type named “Movies”:
function create_custom_post_type() {
    register_post_type( 'products',
        array(
            'labels' => array(
                'name' => __( 'Movies' ),
                'singular_name' => __( 'Movies' )
            ),
            'public' => true,
            'has_archive' => true,
            'rewrite' => array('slug' => 'movies'),
        )
    );
}
add_action( 'init', 'create_custom_post_type' );
Step 3: Customize Your Custom Post Type
Once you have added the custom code to create your custom post type, you can customize it further. This includes adding custom taxonomies, custom fields, and other parameters to make it more functional and relevant to your website.
Step 4: Save Your Changes and Test Your Custom Post Type
Once you have customized your custom post type, save your changes to the functions file and test your custom post type on your website.
Creating custom post types using custom code can give you more control over your website’s functionality and customization. By following the steps outlined in this guide, you can create custom post types in WordPress using custom code and customize your website to fit your unique needs.
Related Articles
How to create custom taxonomy in WordPress?
If you’re a WordPress user, you’re probably familiar with the concept of taxonomies. Taxonomies are used to organize and categorize content on a WordPress site, and they can be especially useful for sites with a large amount of content.
How to create custom taxonomy pages in WordPress?
WordPress is a versatile platform that allows you to create a custom website for your business or personal use. With WordPress, you can create custom post types, custom fields, and custom taxonomies.

![Beautiful Snowfall Animation CSS [ Best Snow Effects ]](https://blog.stackfindover.com/wp-content/uploads/2021/09/Snowfall-Animation-CSS-1024x576.jpg)