
If you’re a WordPress user, you probably already know that posts and pages have predefined status options like published, draft, Unread, etc. However, did you know that you can also add your own custom post statuses? This can be incredibly useful for keeping track of your content and workflow, especially if you run a multi-author blog or website.
In this article, we’ll show you how to add custom post status in WordPress in just a few simple steps.
Why Add Custom Post Status in WordPress?
By default, WordPress comes with a set of post statuses such as published, draft, Unread, and trash. While these statuses are useful for most websites, they may not be enough for some. For example, you may want to create a custom post status for content that needs to be reviewed by a particular team member, or for content that is waiting to be published on a specific date.
Adding custom post statuses to WordPress can help you manage your content more efficiently and make your workflow more streamlined. It can also help you keep track of your content and ensure that it is published at the right time.
How to Add Custom Post Status Using Edit Flow Plugin?
Adding custom post status in WordPress is a straightforward process that can be done by following the steps below:
Step 1: Install and activate the “Edit Flow” plugin
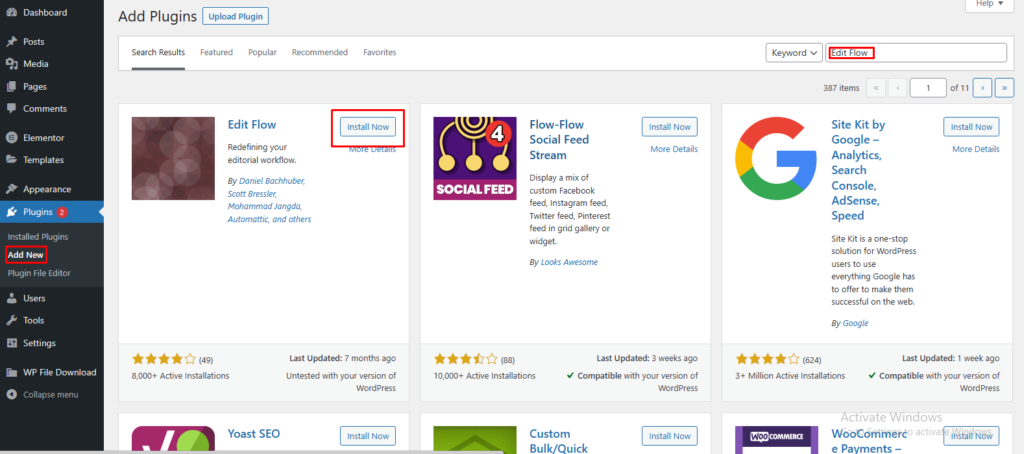
The first step is to install and activate the “Edit Flow” plugin. This plugin is designed to help you manage your editorial workflow by adding custom post statuses, editorial comments, and more.
Step 2: Create a new custom post status
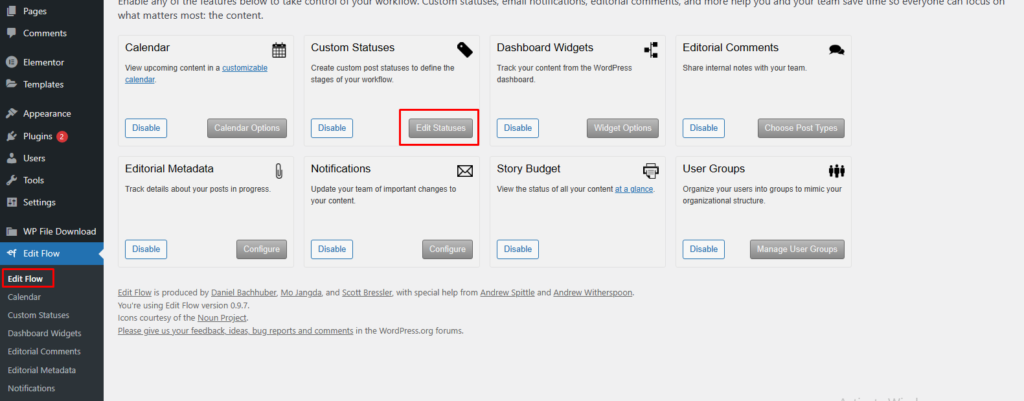
Once you have activated the “Edit Flow” plugin, go to “Edit Flow > Statuses” in the WordPress dashboard. Here, you will see a list of default post statuses along with an option to add new ones. Click on the “Add New Status” button to create a new custom post status.
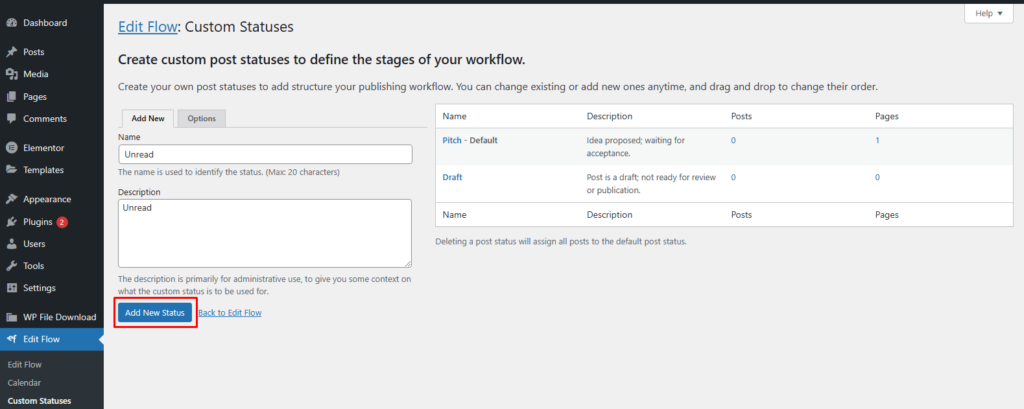
Step 3: Configure the custom post status
After you have created the new custom post status, you can configure it by setting a name, description, color, and icon. You can also choose whether the status should be public or private, and whether it should be available for specific post types.
Step 4: Assign the custom post status to a post
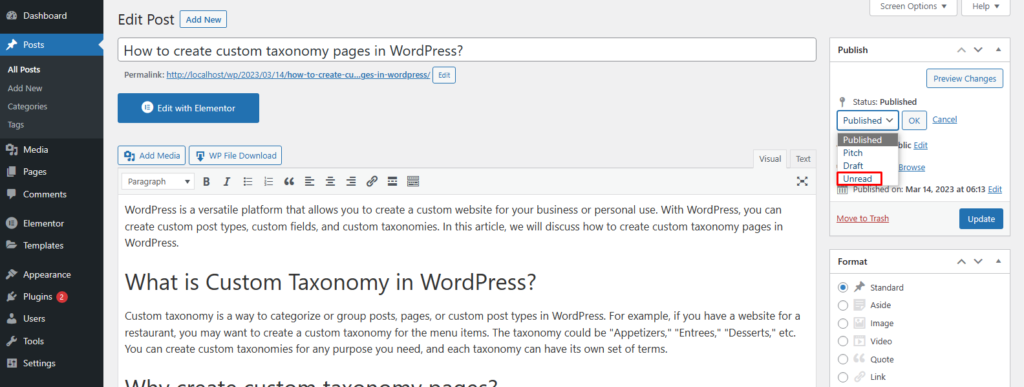
Once you have configured the custom post status, you can assign it to a post by editing the post and selecting the new status from the drop-down menu. You can also filter posts by custom post status in the WordPress dashboard to find and manage your content more efficiently.
How to Add Custom Post Status in WordPress Using Custom Code?
WordPress is one of the most popular Content Management Systems (CMS) out there, thanks to its flexibility and ease of use. One of the features that make WordPress so versatile is the ability to create custom post types and statuses. In this article, we will show you how to add custom post status in WordPress using custom code.
What is a custom post status?
By default, WordPress comes with a few post statuses such as published, draft, and private. However, there might be instances when you need to create a custom post status to reflect the state of your content more accurately. For example, you might want to create a custom post status to indicate that a post is unread or that it’s scheduled for publication at a specific date and time.
Step 1: Create the Custom Post Status
The first step in adding a custom post status in WordPress is to create the status itself. To do this, you will need to add a function to your theme’s functions.php file or create a custom plugin.
Here is an example code to create a custom post status called “Unread:
function custom_post_status() {
    register_post_status( 'unread', array(
        'label'                     => _x( 'Unread', 'post' ),
        'public'                    => true,
        'exclude_from_search'       => false,
        'show_in_admin_all_list'    => true,
        'show_in_admin_status_list' => true,
        'label_count'               => _n_noop( 'Unread <span class="count">(%s)</span>', 'Unread <span class="count">(%s)</span>' )
    ) );
}
add_action( 'init', 'custom_post_status' );
You can modify the code to suit your needs. Just make sure to replace “unread” with your desired custom post status name.
Step 2: Add the Custom Post Status to Your Posts
After creating the custom post status, you will need to add it to your posts. To do this, you will need to add a filter to your theme’s functions.php file or create a custom plugin.
Here is an example code to add the custom post status to your posts:
function custom_post_status_options( $post_status_options ) {
    $post_status_options['unread'] = __( 'Unread', 'post' );
    return $post_status_options;
}
add_filter( 'display_post_states', 'custom_post_status_options' );
Step 3: Modify the Post Query
The final step is to modify the post query to include your custom post status. To do this, you will need to add a filter to your theme’s functions.php file or create a custom plugin.
Here is an example code to modify the post query:
function custom_post_status_query( $wp_query ) {
    if ( $wp_query->query['post_status'] == 'Unread' ) {
        $wp_query->query_vars['post_status'] = array( 'uread', 'publish' );
    }
}
add_filter( 'pre_get_posts', 'custom_post_status_query' );
This code will ensure that posts with the “Unread” status are included in the query.
Conclusion
In conclusion, adding a custom post status in WordPress is easy and can be done using custom code and using plugins. By creating a custom post status, you can better reflect the state of your content and make it easier for your team to collaborate on content creation. Just follow the steps outlined in this article, and you’ll be on your way to creating custom post statuses in WordPress.
Related Articles
How to create custom taxonomy in WordPress?
If you’re a WordPress user, you’re probably familiar with the concept of taxonomies. Taxonomies are used to organize and categorize content on a WordPress site, and they can be especially useful for sites with a large amount of content.
How to create custom post type in WordPress?
WordPress is a popular platform that provides a plethora of features and options to website owners. One of the most significant features is the ability to create custom post types.


spent over two hours trying to get this to work….. it does NOT work (6/21/21023 – with current WP and plugins.)
what issue are you facing?
Please share a bit more detail about your query so that I can better understand the error you are facing and try to solve it.