
WordPress is a helpful platform that allows us to create and manage our website with ease. One of its best features is the sidebar, which can be customized to fit your preferences. sidebar is important because it helps visitors find important information on your website easily. In this article, we will guide you on how to create a custom sidebar in WordPress.
#1: How to create a custom sidebar using a plugin?
Step 1: Understanding the WordPress Sidebar
Before we start making a custom WordPress sidebar, let’s understand what it is and what it does. A sidebar is a column on the side of a website’s main content area. It usually has links to important pages, recent posts, and search bars. In WordPress, the sidebar is usually on the right side of the page, but you can change it to be on the left or both sides.
Step 2: Choosing a WordPress Sidebar Plugin
WordPress has many plugins that can help us to create custom sidebars. One of the best plugins is the Custom Sidebars plugin. It allows us to make sidebars for specific pages, posts, or categories. We can also show different widgets on different page.
Step 3: Installing and Activating the Custom Sidebars Plugin
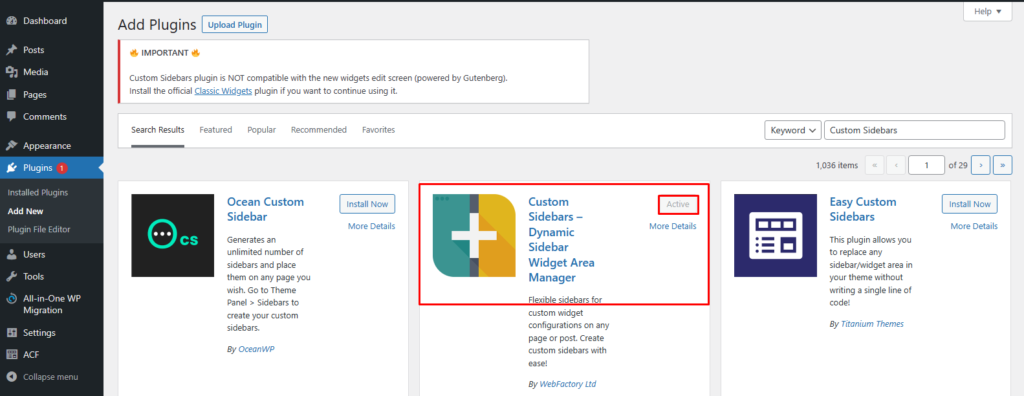
To install the Custom Sidebars plugin, go to your WordPress dashboard, click on “Plugins” and then “Add New.” Search for “Custom Sidebars,” and once you have located it, click on “Install Now.” Once the plugin has been installed, click on “Activate” to activate it.
Step 4: Creating a Custom Sidebar
Once you have installed and activated the Custom Sidebars plugin, you can now create a custom sidebar. To do this, go to your WordPress dashboard, click on “Appearance” and then “Custom Sidebars.” Click on “Add New” to create a new custom sidebar. Give your sidebar a name and description, then click on “Create Sidebar.”
Step 5: Adding Widgets to Your Custom Sidebar
After creating your custom sidebar, you can now add widgets to it. To do this, go to your WordPress dashboard, click on “Appearance” and then “Widgets.” You will see your custom sidebar listed here. Drag and drop the widgets you want to add to your custom sidebar. You can also rearrange the widgets by dragging and dropping them to the desired position.
Step 6: Assigning Your Custom Sidebar to a Page
Once you have added widgets to your custom sidebar, you need to assign it to a specific page. To do this, go to your WordPress dashboard, click on “Pages” and then “All Pages.” Select the page you want to assign the custom sidebar to and click on “Edit.” On the right-hand side of the page, you will see a drop-down menu labeled “Custom Sidebar.” Select your custom sidebar from the drop-down menu and click on “Update” to save your changes.
#2: How to create a custom sidebar using a custom code?
To create a custom sidebar, we will need to use custom code. We will start by creating a new file in our website’s active theme folder called “sidebar.php”. This file will contain the code for our custom sidebar.
Step 1: Register a New Sidebar
The first step is to register our new sidebar with WordPress. We can do this by adding the following code to our functions.php file
function custom_sidebar() {
  register_sidebar( array(
    'name'          => __( 'Custom Sidebar', 'custom-sidebar' ),
    'id'            => 'custom-sidebar',
    'description'   => __( 'Add widgets here to appear in your custom sidebar.', 'custom-sidebar' ),
    'before_widget' => '<div id="%1$s" class="widget %2$s">',
    'after_widget'  => '</div>',
    'before_title'  => '<h2 class="widget-title">',
    'after_title'   => '</h2>',
  ) );
}
add_action( 'widgets_init', 'custom_sidebar' );
This code registers a new sidebar with the name “Custom Sidebar”. We can change the name and other parameters as per our requirements.
Step 2: How to Display Sidebar
The next step is to add the code to display our custom sidebar. We can add the following code to our sidebar.php file:
<?php if ( is_active_sidebar( 'custom-sidebar' ) ) : ?>
  <div id="secondary" class="widget-area" role="complementary">
    <?php dynamic_sidebar( 'custom-sidebar' ); ?>
  </div><!-- #secondary -->
<?php endif; ?>
Step 3: Add Widgets to Sidebar
Finally, we can add widgets to our custom sidebar. We can do this by going to Appearance > Widgets in our WordPress dashboard and dragging and dropping the widgets we want to add into the “Custom Sidebar” area.
Conclusion
Creating a custom sidebar can be a great way to add more functionality to your website. By following the steps outlined in this article, you can create your own custom sidebar in no time.
FAQ’s
A custom sidebar is a section of a website that appears on the side of the main content and displays additional information like important links, recent posts etc.
Creating a custom sidebar for your website can be an excellent way to enhance its functionality and make important information easily accessible.
Yes, you will need to have some coding experience to create a custom sidebar using custom code. However, you can also use plugins or themes that provide pre-built custom sidebar options.
Yes, you can add images or videos to your custom sidebar using HTML or a WordPress shortcode. This can be useful for adding visual content, such as product images or promotional videos, to your sidebar.


![HTML Resume Templates [ 20 Best Resume Designs ]](https://blog.stackfindover.com/wp-content/uploads/2021/09/html-resume-1024x576.jpg)
