
Are you eager to learn how to effectively present your featured images in your WordPress website? The featured image is a crucial component of your content, acting as a visual magnet that captures the essence of your article.
In this comprehensive guide, we’ll navigate you through the process of displaying the featured image in WordPress, complete with illustrative coding examples. Whether you’re a newcomer or a seasoned WordPress user, this article will empower you with the knowledge to make your featured images truly shine.
The Significance of Featured Images
Featured images play a pivotal role in enhancing the overall user experience on your website. They provide a contextual preview of your articles, making them more shareable and attention-grabbing across social media platforms and search engine results pages.
Setting Up a Featured Image in WordPress
To set up a featured image, follow these simple steps:
Adding a Featured Image via the Edit Post/Page Screen
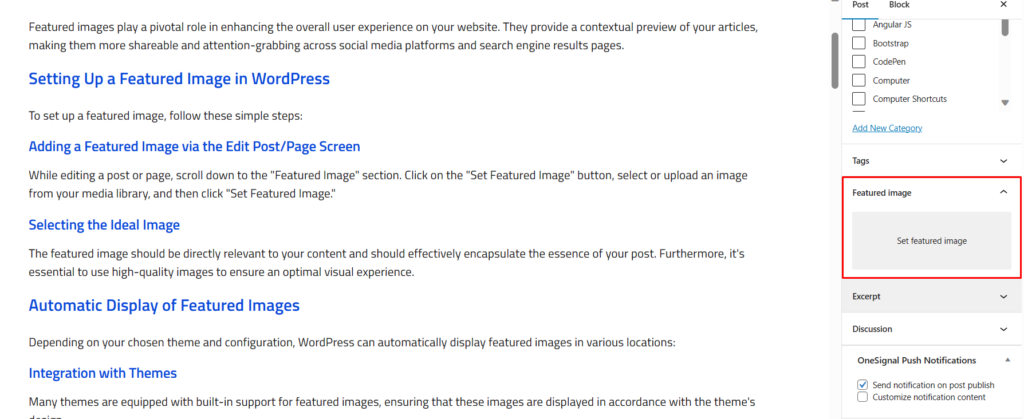
While editing a post or page, scroll down to the “Featured Image” section. Click on the “Set Featured Image” button, select or upload an image from your media library, and then click “Set Featured Image.”
Selecting the Ideal Image
The featured image should be directly relevant to your content and should effectively encapsulate the essence of your post. Furthermore, it’s essential to use high-quality images to ensure an optimal visual experience.
Automatic Display of Featured Images
Depending on your chosen theme and configuration, WordPress can automatically display featured images in various locations:
Integration with Themes
Many themes are equipped with built-in support for featured images, ensuring that these images are displayed in accordance with the theme’s design.
Leveraging Plugins for Enhanced Control
Plugins like “Featured Image” and “Dynamic Featured Image” offer advanced customization options for displaying featured images across various post types and locations.
Manual Display using Custom Code
For a higher degree of control over the presentation of your featured image, you can employ custom code. This process involves a grasp of WordPress themes and templates.
Grasping WordPress Themes and Templates
WordPress themes consist of template files that dictate the layout and appearance of your website. By modifying these templates, you can tailor the display of featured images to your liking.
Harnessing Template Tags for Featured Images
Template tags like the_post_thumbnail() enable you to manually insert featured images into specific WordPress template files.
Enabling Support for Featured Image
Before you dive into showcasing featured images, ensure that your WordPress theme supports this feature. Most modern themes do, but it’s always wise to confirm. To check and enable support, follow these steps:
- Access Theme Functions: Log in to your WordPress dashboard, navigate to the theme editor under “Appearance,” and find the
functions.phpfile. - Add Theme Support: Insert the following code snippet within the
functions.phpfile:
add_theme_support('post-thumbnails');This line of code enables support for featured images in your theme.
Setting a Featured Image
After enabling support, it’s time to set a featured image for your posts or pages. Here’s how:
- Edit Post/Page: While editing or creating a post/page, look for the “Featured Image” box on the right side.
- Upload Image: Click on the “Set Featured Image” link, then upload or select an image from your media library.
- Set as Featured Image: Once the image is uploaded, click the “Set Featured Image” button.
Function Reference
To display featured images using code, you can use the following function:
the_post_thumbnail();
Place this code within your WordPress loop to automatically display the featured image for each post.
Image Sizes
WordPress provides various image sizes to fit different areas of your website. Common sizes include thumbnail, medium, large, and full size. You can also define custom image sizes.
Add Custom Featured Image Sizes
To add custom image sizes, use the add_image_size function in your theme’s functions.php file. For example:
add_image_size('custom-size', 300, 200, true);Set the Featured Image Output Size
You can specify the output size when using the the_post_thumbnail function. For instance:
the_post_thumbnail('medium');Styling Featured Images
Styling featured images can enhance their visual appeal and integration with your theme. Use CSS to apply styles that match your website’s design.
Examples
Let’s look at some coding examples to solidify our understanding:
if (has_post_thumbnail()) {
   the_post_thumbnail();
}
This code checks if a featured image exists and then displays it.
Linking to Post Permalink or Larger Image
You can wrap the featured image with a link to the post permalink or the larger image:
if (has_post_thumbnail()) {
   echo '<a href="' . get_permalink() . '">';
   the_post_thumbnail('medium');
   echo '</a>';
}
FAQs
Absolutely! You can use the add_image_size function to define custom image sizes tailored to your website’s needs.
If a featured image is not set, you can choose to display a default image or leave the space blank.
Most modern themes do support featured images, but it’s recommended to verify this in your theme’s documentation.
Yes, you can apply custom styles to featured images using CSS to ensure they seamlessly integrate with your theme’s design.
You can explore the official WordPress Codex and various online tutorials to expand your knowledge of WordPress development.
Conclusion
Displaying featured images in WordPress is a simple yet powerful way to enrich your website’s visual experience. By following the steps outlined in this article, you can seamlessly enable support, set featured images, and customize their display through code. Enhance your site’s aesthetics and engage your visitors like never before.


![15+ CSS text stroke Examples [ Best CSS Outline Text ]](https://blog.stackfindover.com/wp-content/uploads/2021/08/CSS-text-stroke-1024x576.jpg)